
Hi guys!
In this tutorial we’ll see how to deal with spline intersections in 3ds Max, with the help of Spline Combiner‘s Intersections Detection tool.
3ds Max lacks a ‘snap to intersections’ feature. Besides, all operations between splines (like boolean functions, trimming, etc.) require all splines to be part of the same shape. So, if you need to create new shapes from existing ones, it turns a really time-consuming and inefficient task.
Here’s when Spline Combiner comes in to make your life easier. The plugin can detect all kind of intersections between splines (between different shapes, spline subobjects and self intersections) and then perform a series of actions like placing helpers at intersections, refine the splines or break them and detach them all.
Placing helpers at intersections
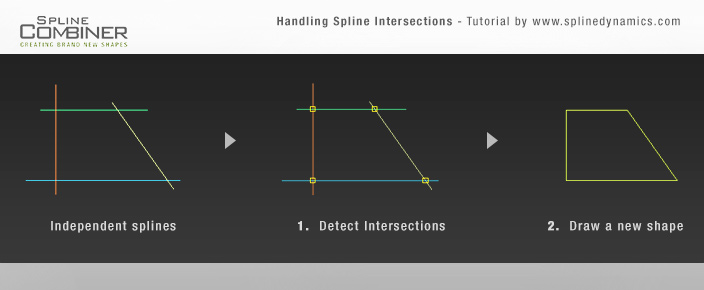
Consider the following situation: you have 4 independent splines, like in the first graphic in the image above. Your goal is to get the shape inscribed between those splines (see the last graphic on the right). For that, since they are all straight lines, the easiest way would be to draw the final shape by snapping to the intersections. Spline Combiner can help us by automatically placing a point helper at each intersection. Let’s start. Prepare a similar scene in 3ds max and follow these steps:
1. Open Spline Combiner, close the first and second rollouts and open the one named Detect Intersections.
2. Select all the shapes you want to find intersections for.
3. In this case, tick only the checkbox labeled Between different shapes.
4. At Action area, select the option None. (No action is needed apart from the intersections detection)
5. At Helpers area, turn on Place helpers checkbox.
6. Then press DETECT INTERSECTIONS.
7. Voila! You now have one helper per intersection. You can change their color and size with the controls in the Helpers area.
8. Turn on 3ds Max snap tool and at the snapping options check only “Pivot“.
9. Now, with the Line tool, draw the final shape. (You can select the helpers through the Named Selection Sets dropdown list in 3dsMax and delete them if you want)
Ready! Nice, quick and simple. 🙂 Practice this method and you’ll see how faster you work this way.
Now we’ll see another method to handle a slightly more complex situation.
Refining or breaking splines at intersections
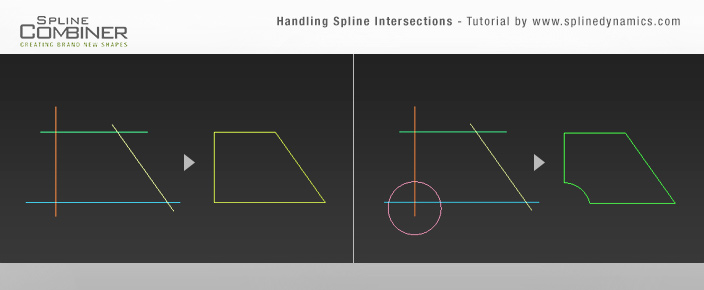
Consider the situation in the first graphic of the image above. There are 5 independent splines. Your goal is to get from them the shape in the last graphic on the right.
Spline Combiner can perform a variety of actions after detecting spline intersections. You can choose either to Refine the splines at those points, to Split (or break) them, or to break and detach them all as new objects.
So, let’s start. Prepare a scene in 3ds Max, containing something similar to the first graphic in the image and follow these steps:
1. Open Spline Combiner > Detect Intersections rollout.
2. Select the shapes you created.
3. At Action area, check Split option and leave Detach all elements on.
4. Uncheck Place helpers if it is on. Then press DETECT INTERSECTIONS.
5. Once the plugin has finished the task, you will get many individual splines, like you see in the 2nd graphic at the image above.
6. Now just select and delete the unnecessary splines, leaving only the ones that make the final shape.
7. Since the splines are individual objects, you need now to attach them all and weld their vertices. So, go down in the plugin’s UI and open the Tools rollout. Use the corresponding tools Attach Selected and Weld Vertices to complete the task.
Ready! You have now a clean and closed final shape.
Note: If you need to make this exercise but, instead of having different individual splines, you have a single shape containig many spline subobjects and want to keep it that way, you can use the options Splines of same shape and Refine. Then work in subobject mode to delete the leftovers and weld the vertices.
That’s all for now. If you have any doubts or consultations, please post a comment down here or write us through the Contact Form.
Hope you liked it! Cheers!


