Optimize, Repair and Organize Splines in 3ds Max
Version: 2.0
Compatibility: 3ds Max 2015 and higher
Publisher: Spline Dynamics
Product page: https://www.splinedynamics.com/spline-cleaner/
Official manual: https://www.splinedynamics.com/spline-cleaner-manual/
Table of Contents
- Overview
- What’s New in Version 2
- Key Features
- Version Requirements, License & Installation
- The User Interface: Overview
- Splines Info Dialog
- Splines Tab
- Vertices Tab
- More Tools Tab
- Basic Parameters Tab
- Help Tab
- Trial Version
- Contact / Support
Overview
Spline Cleaner is an advanced batch-processing tool for cleaning, repairing and managing spline curves inside Autodesk 3ds Max.
It is built for anyone who needs to clean up CAD imports, repair vector curves, or prepare splines for extrusion. It saves hours of manual clean-up work and helps you get error-free geometry. It’s especially useful with architectural plans, animation paths, terrain contour lines, logos, vector text, or any spline-based 3D project.
Typical audiences for this tool include professionals in:
- Architectural Visualization (ArchViz)
- CG Animation
- 3D Design
- Game Art
- Motion Graphics
- VFX
- Industrial Design
What’s New in Version 2
Spline Cleaner 2 is a major new version of the plugin.
New features
- Redesigned user interface. All the tools now live in a single dialog organized in tabs, with grouped controls, bigger action buttons and a help icon in each group.
- Expose Loose Ends. Marks the disconnected end vertices of open splines directly in the viewport.
- Expose Overlapping Vertices. Marks the overlapping vertices inside each spline directly in the viewport, without running a diagnosis or modifying the scene.
- Adjustable marker size and color for every Expose option, remembered between sessions. Sizes 2-3 are much easier to read than the native 3ds Max markers.
Improvements to existing tools
- Explode keeps the render settings of the original shape (renderable, thickness, viewport display, interpolation, etc.).
- Make Diagnosis remembers its detection thresholds between sessions.
- Weld Vertices: wider range for the distance threshold.
- Weld, Optimize and Reduce Vertices report the result of the operation.
- Every action button has a tooltip, and shows a “Nothing selected.” warning when there’s nothing to process.
- The command panel stays on the Modify tab after Weld and after the Container filter.
If you own Spline Cleaner v1.x, see Spline Cleaner v2: Information for Existing Users for your upgrade options.
Key Features
Core Functions
- Remove Duplicate Splines: automatically detects and deletes duplicate spline shapes or overlapping segments to clean up messy scenes.
- Delete Isolated Vertices: identifies and removes stray vertices that don’t belong to any spline, and removes empty shapes with no splines.
- Close Open Splines: fixes gaps in spline shapes so they’re ready for extrusion or further modeling.
- Simplify Curves: optimizes straight lines and reduces unnecessary vertices on curves while preserving their original shape.
- Change Spline Direction: ensures all spline curves are oriented consistently, avoiding modeling issues down the line.
Workflow Optimization
- Batch Processing: apply cleaning operations to multiple splines at once.
- Auto-Weld Vertices: automatically joins overlapping vertices within a specified tolerance.
- Flatten Splines: projects all spline points onto a single plane for easier 2D editing.
- Filter Splines by Properties: isolate splines based on properties such as open/closed status, curve length, or vertex count.
Advanced Tools
- Segment Optimization: adjusts spline segmentation to improve performance without compromising accuracy; also normalizes splines.
- Error Reporting: highlights problematic splines in the scene and provides detailed reports for easier debugging.
- Expose Tools: shows vertex ticks, vertex numbers, material IDs, loose ends and overlapping vertices right in the viewport, with adjustable size and color.
- Support for Materials: preserves spline materials and material IDs across all operations.
- Customizable Settings: fine-tune cleaning parameters to match each project’s specific needs.
Version Requirements, License & Installation
Version Requirements
Compatible with 3ds Max 2012 and higher. Spline Cleaner has been tested successfully on 3ds Max 2012 through 2024, and is expected to keep working on future versions. If you find any issue, please report it to contact@splinedynamics.com.
License
Each purchase includes either a 1-year license or a lifetime license, depending on the option chosen at checkout. Licenses are node-locked (tied to the computer, not to the user).
- Regular License: usable on 2 different workstations. It includes 2 license keys, each linked to one computer.
- Corporate License: usable on up to 10 workstations. It includes 2 license keys, each covering up to 5 computers.
Free updates are provided for the same major version of the product (2.x).
Spline Cleaner 2 uses its own license keys: a v1.x license key won’t activate v2. If you own v1.x, see the upgrade options for existing users.
Installation
- Unzip the contents of the downloaded
.zipfile, then drag the.mzpfile onto any viewport in 3ds Max. The plugin installs itself automatically. - A “Software Activation” dialog will appear. Enter your license key in the text field (the key is sent by email at the time of purchase).
- If the key is valid, Spline Cleaner starts immediately.
- To add the plugin to a toolbar: go to the Menu → Customize → Customize User Interface…
- Open the “Toolbars” tab and select the category “Spline Dynamics.”
- Locate “Spline Cleaner 2” in the list, drag it onto any toolbar, and you’re done.
Installing v2 alongside v1.x
Spline Cleaner 2 installs as a separate plugin, with its own license, settings and toolbar button. It doesn’t replace or modify an existing v1.x installation, so both versions can be installed and used on the same computer.
The User Interface: Overview
Spline Cleaner 2 works from a single dialog with five tabs. Each tab is shown as an icon at the top of the dialog; hover over it to see its name.
- Splines: opens the Splines Info Dialog, and contains Attach Selected, Action by Filter and Explode.
- Vertices: Weld Vertices, Optimize, Normalize, Reduce Vertices, Connect Vertices and Vertex Type.
- More Tools: Close Splines, Flatten, Vertex Numbering and Extrusion Direction.
- Basic Parameters: changes the standard Editable Spline parameters (rendering, interpolation, etc.) for multiple splines at once.
- Help: Quick Start Help, links to tutorials and to this manual, and license activation.
Inside each tab, the controls are organized in titled groups. Next to the title of most groups there is a question-mark icon. Hovering over it shows a quick tooltip; clicking it opens an extended help dialog with more detail.
Splines Info Dialog
Open it with the Splines Info Dialog button, at the top of the Splines tab.
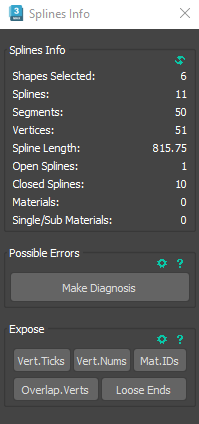
The Splines Info Dialog helps you find errors in your splines and monitor changes as you apply different operations to your curves. It shows detailed information about the currently selected shapes: shapes selected, splines, segments, vertices, spline length, open and closed splines, materials and single/sub materials.
It’s recommended to keep this dialog open while using the plugin. The information updates interactively whenever you change the selection or perform an operation. In some cases the dialog needs a manual refresh; use the Refresh icon for that.
If any selected shape is not an Editable Spline, or has modifiers applied to it, a Warning Icon (yellow triangle) appears next to the Refresh icon. Clicking it offers the option to convert those shapes to Editable Splines.
All data shown in the dialog comes only from shape objects (other object types are ignored) and represents totals across the current selection.
Possible Errors: Make Diagnosis
Clicking Make Diagnosis tells Spline Cleaner to scan the selection for possible errors:
- Overlapping Duplicates: very similar shapes that are almost in the same place.
- Overlapping Splines/Segments: totally or partially overlapping splines or subsplines.
- Overlapping Vertices: knots within the same shape that are very close to each other.
- Empty Shapes: shapes with only one knot or none.
The results are shown in the Diagnosis board, with the number of shapes found for each type of error. Each type has a checkbox: check the ones you want and press Select Marked Shapes to select those shapes directly and start fixing them. If no errors are found, the board shows a “No Errors Found” message instead.
The Settings icon in the Possible Errors group opens the Settings dialog (the same one the Expose group’s icon opens). In its Error Detection group you can adjust the thresholds used for the detection:
- Overlapping Vertices, Threshold: the maximum distance between two vertices for them to be considered overlapping.
- Overlapping Splines, Threshold: the maximum distance between splines for them to be considered overlapping.
These values are remembered between sessions.
Expose
The Expose group displays spline data directly in the active viewport, for the selected shapes, via five checkbuttons:
- Vert.Ticks: shows a tick mark on every vertex.
- Vert.Nums: shows the number of every vertex.
- Mat.IDs: shows the material ID of every segment.
- Overlap.Verts: marks with an asterisk the vertices that overlap within the same spline, using the Overlapping Vertices threshold from the Settings dialog. Vertices of different splines are never marked against each other. The markers update when you release the mouse after editing, not while you drag a vertex.
- Loose Ends: marks the end vertices of open splines (the disconnected vertices that typically break an extrude, a loft or the closing of an outline). Closed splines are not marked.
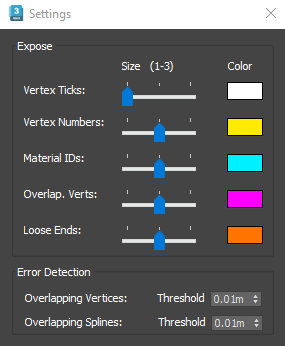
The Settings icon in the Expose group opens the same Settings dialog, where, in its Expose group, you can set the size (S / M / L, positions 1 to 3 of the slider) and the color of each kind of exposed data:
- S is the classic 3ds Max size. M and L draw progressively larger markers and numbers, much easier to read.
- Defaults: Vertex Ticks in S; Vertex Numbers, Material IDs, Overlapping Vertices and Loose Ends in M.
- Each option remembers its own size and color between sessions.
- The Overlapping Vertices threshold, in the Error Detection group of the same dialog, is the tolerance used by Overlap.Verts.
Vertex Numbers and Material IDs at size L can feel sluggish with more than ~20,000 vertices selected; use M or S for very large selections.
Splines Tab
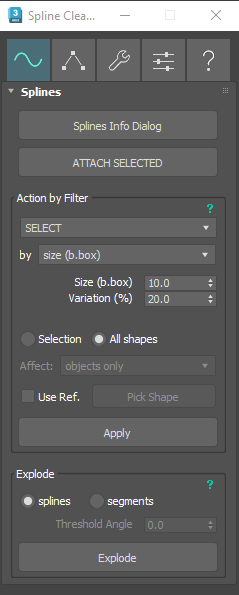
Splines Info Dialog
Opens the Splines Info Dialog (see Splines Info Dialog above).
Attach Selected
Combines all currently selected shapes into a single object with one click.
Action by Filter
Action by Filter groups together all the actions you can perform using filters. There are 4 actions (Select, Attach, Detach, Delete) and 11 filters you can combine with them. Not every filter supports every action.
Filter list: Size (b.box), Length, Proximity, Similar Look, No. of Vertices, Wirecolor, Container (b.box), Layer, Double Splines, Open/Closed, Overlapping Splines.
Parameters area: each filter exposes its own set of parameters, which change depending on which filter is active. If a “+” icon appears in the parameters area, it means advanced parameters are available but hidden by default; click it to reveal them.
Selection / All Shapes: radio buttons that let you choose whether the action applies to the current selection or to all shapes in the scene.
Affect: for filters that can operate at the subobject level, this dropdown controls the scope of the action (objects only, subobjects only, or objects + subobjects).
Use Ref.: some filters allow, or require, picking a reference shape to use as a sample. Click Pick Shape to choose it. For example, with the Size (b.box) filter, checking Use Ref. disables the manual size spinner and uses the picked shape’s size instead.
Apply: executes the selected action.
Filters: Detailed Description
Size (b.box)
Searches for shapes/splines using the size of their bounding box as reference.
- Size (b.box): the size of the longest side of the shape’s bounding box.
- Variation (%): percentage of variation allowed around the size value. Example: size = 10, variation = 20% → accepted range is 8 to 12.
Length
Searches for shapes/splines with a certain length.
- Length: the reference length to search for.
- Variation (%): percentage of variation allowed around the length value.
Proximity
Searches for shapes/splines close to a reference shape. Requires picking a reference shape (when used with Attach, you may skip picking a reference if you want to attach nearby shapes in groups by closeness).
- Max. Distance: maximum distance from the reference to search within.
- Max. Size (b.box): maximum allowed size of matching splines (longest bounding-box side).
- Min. Size (b.box): minimum allowed size of matching splines.
Similar Look
Searches for shapes/splines with an appearance similar to a reference shape. Requires picking a reference shape. It works by sampling points along the splines to evaluate similarity, which is resource-intensive. For identical duplicates, the Length filter is faster and recommended instead.
- Threshold: how much difference from the reference is allowed (distance between knots).
- Sampling frequency: how often samples are taken along the splines.
- Max. Distance: the maximum allowed distance from the reference shape.
No. of Vertices
Searches for shapes/splines with a specific number of vertices/knots.
- No. of Vertices: target vertex count.
- Variation (%): percentage of variation allowed around that count.
Wirecolor
Searches for shapes with a specific wirecolor. Tip: picking a reference shape makes this faster and more precise.
- Color picker: pick or enter the reference color.
- Use All Wirecolors: (Attach mode only) attaches shapes in groups by their wirecolor.
Container (b.box)
Searches for shapes contained inside another shape (based on bounding boxes) and attaches them together. Works only with the Attach action. Very useful for combining the curves that make up compound letters (like “A” or “D,” which have inner and outer splines).
- Max. No. of shapes: maximum number of shapes allowed per container.
Layer
Attaches shapes by layer. Works only with the Attach action. If a reference shape is picked, only shapes on its layer are attached together.
- Ignore Hidden Layers: if checked, hidden shapes are excluded.
Double Splines
Searches for overlapping duplicate shapes or splines.
- Max. Distance: the maximum allowed distance between overlapping splines to be considered duplicates.
Open/Closed
Searches for open or closed splines. (Shapes containing a mix of open and closed splines are ignored.)
- open/closed: radio buttons to choose which type to search for.
Overlapping Splines
Searches for totally or partially overlapping splines/segments.
- Tolerance: the maximum distance between splines for them to be considered overlapping.
Explode
Detaches all splines or segments from the selected shapes. Choose splines to detach each spline as a separate shape, or segments to detach the segments. In segments mode, adjacent segments can be kept together as groups using the Threshold Angle.
- Threshold Angle: (segments mode only) adjacent segments stay grouped together if the angle between them is less than or equal to this value.
The resulting shapes keep the render settings of the original shape (renderable, thickness, viewport display, interpolation), as well as its material and material IDs.
Vertices Tab
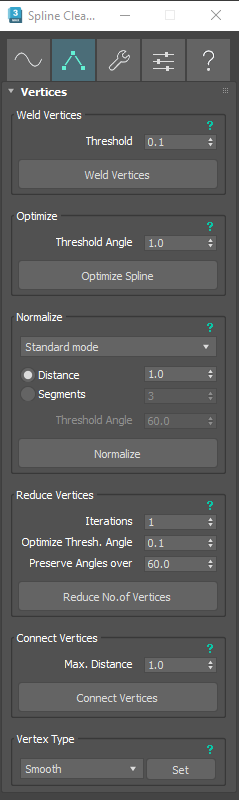
Weld Vertices
Welds all vertices within a given distance threshold, across the selected shapes. When it’s done, it reports the result of the operation.
- Threshold: the maximum distance allowed between vertices for them to be welded together.
Optimize
Removes excessive vertices from splines. The angle threshold lets the tool also affect curved segments. When it’s done, it reports the result of the operation.
- Threshold Angle: if the angle between two segments is equal to or below this value, the knot between them is removed.
Normalize
Rebuilds the selected spline(s) with evenly distributed vertices. Two modes are available:
Standard mode: redraws the entire spline from scratch, setting all resulting knots to smooth.
- Distance: distance between vertices.
- Segments: total number of segments per spline.
Smart mode: tries to preserve the original shape as closely as possible while keeping the important vertices. Internally, it divides each spline into groups of adjacent segments (“lines”); the Threshold Angle defines the cutting point between lines.
- Distance: distance between vertices.
- Segs. by line: number of segments per line.
- Threshold Angle: determines which vertices are considered important and left unchanged. Values of 45 or 60 work well in most cases.
Reduce Vertices
Reduces the number of vertices in the selected splines while preserving the overall shape. Ideal for progressively lowering the resolution of splines: it works by removing roughly one out of every two knots per iteration, while also removing excess vertices and preserving important ones. When it’s done, it reports the result of the operation.
- Iterations: how many times the reduction pass is repeated. Higher values produce more aggressive reduction.
- Optimize Thresh. Angle: if the angle between two segments is equal to or below this value, the knot between them is removed.
- Preserve Angles over: sharp angles between adjacent knots greater than this value are kept unchanged.
Connect Vertices
Connects nearby vertices by creating a new segment between them.
- Max. Distance: the maximum distance allowed between vertices for a connection to be made.
Vertex Type
Changes all vertices in the selected shapes to a chosen type: Smooth, Corner, Bezier, or Bezier Corner. Choose the type from the list and press Set to apply.
More Tools Tab
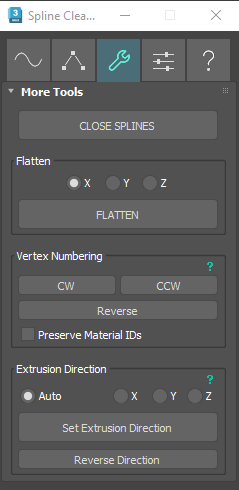
Close Splines
Closes open splines by adding a linear segment between their open ends.
Flatten
Flattens the splines in the selected shapes onto the X, Y, or Z axis/plane. Choose the axis and press Flatten.
Vertex Numbering
Manages the vertex numbering order (the direction) of the selected splines.
- CW / CCW: sets the vertex numbering of the splines to clockwise or counterclockwise.
- Reverse: inverts the numbering of the vertices in the selected splines.
- Preserve Material IDs: if checked, material IDs stay on their original segments; if unchecked, they are reversed along with the vertex order.
Extrusion Direction
Resets a shape’s internal orientation to correct the direction of extrusion. Useful when an Extrude modifier extrudes a shape in the wrong direction (parallel to the shape’s own plane); this tool quickly corrects that.
- Auto / X / Y / Z: choose an axis, or let Spline Cleaner detect it automatically, and press Set Extrusion Direction.
- Reverse Direction: flips the extrusion to the opposite side.
Basic Parameters Tab
This tab exposes the same general parameters every Editable Spline object has in 3ds Max:
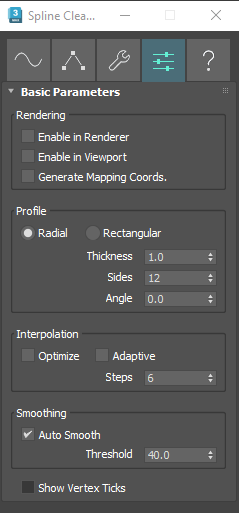
- Rendering: Enable in Renderer, Enable in Viewport, Generate Mapping Coords.
- Profile: Radial (Thickness, Sides, Angle) or Rectangular (Length, Width, Angle).
- Interpolation: Optimize, Adaptive, Steps.
- Smoothing: Auto Smooth and its Threshold.
- Show Vertex Ticks.
The key advantage here is being able to set these parameters across multiple splines simultaneously, from a single place, instead of editing each spline individually.
Help Tab
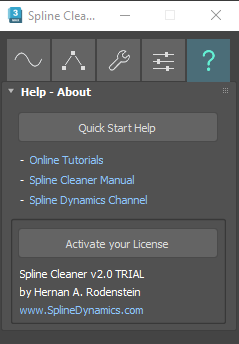
- Quick Start Help: opens a quick visual guide to the plugin.
- Links to the Online Tutorials, the Spline Cleaner Manual (this page) and the Spline Dynamics YouTube channel.
- Activate your License: opens the Software Activation dialog, to activate the full version from the trial, or to make a new activation.
- Version information.
Trial Version
Spline Cleaner 2 offers a 10-day trial, which is a fully functional version of the plugin with one restriction: it can manage up to 300 shapes / 10,000 splines at a time.
The trial installs alongside v1.x without touching it, so v1.x users can try v2 with their own scenes before deciding.
- Purchase: https://www.splinedynamics.com/product/spline-cleaner/
- Trial download: available from the product page
Contact / Support
For custom support, suggestions, or business proposals, use the contact form.
You can also reach us directly at contact@splinedynamics.com.
Related Resources
These tutorials were recorded with Spline Cleaner v1.x. The tools work the same way in v2, but they are now organized in tabs.