
General Considerations
Spline Refiner is a 3dsMax productivity tool thought to automate and speed-up the tedious task of subdividing all the segments of a shape manually, trying to achieve a general uniform vertex distribution along the splines.
This is not a normalization tool, like 3dsMax’s Normalize Spline modifier. It’s a Smart Subdividing tool.
The goal of this plugin is to get an even segmentation of the splines while preserving all the original vertices and shape intact.
Since this tool was ment to use at a final stage of the curves edition, it works better when provided with clean shapes, without overlapping vertices or other problematic issues, that may cause undesired results.
Spline Refiner works on any type of shape but will convert the base object to Editable Spline (keeping all the modifiers intact). It supports shapes with modifiers assigned (even geometry builders like Extrude modifier), because it works on the base object level.
The plugin can operate on multiple shapes simultaneosly, fast and efficiently. It takes only a few seconds to process hundreds of splines.
To start working with your selected shapes in Spline Refiner, the first thing we suggest is to turn on ‘Show vertex ticks’ (at the bottom of the plugin’s UI). This way you will be able to see all the changes in segmentation in realtime.
Start trying Spline Refiner and play with the parameters of Equalize Subdivision tool. The following is a description of all the tools in the plugin’s UI.
Equalize Subdivision
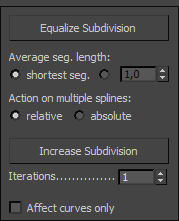
This is the key tool of this plugin. It analyzes every segment of the spline/s and, according to the provided parameters, determines the best way to get the most uniform subdivision possible, without altering the existing shape and vertices.
It doesn’t use a fix segmentation value. Instead, it takes an approximate (average) segment length, wich you can choose to be calculated automatically (using the length of the shortest segment in spline) or set a custom value.
If you are working with multiple splines and you want to have a uniform subdivision across all splines, then choose the options shortest seg. and absolute.
If you want the plugin to calculate a specific subdivision for each spline, then choose the options shortest seg. and relative.
The image above clearly shows how the parameters of Equalize Subdivision work. (‘Automatic’ refers to choosing the option ‘shortest seg.‘ as the average segment length.)
Increase Subdivision
This tool divides every segment of the splines in 2 halves, doubling the general segmentation.
The Iterations parameter sets how many times the function will be recursively applied.
The ‘Affect curves only’ checkbox it’s an important feature that affects both Equalize Subdivision and Increase Subdivision functions.
If active, the tools will subdivide only the curved parts and leave straight lines intact. Very powerful feature!
Additional Tools
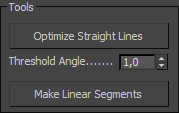
Optimize Straight Lines (button)
Removes all unnecessary vertices from straight lines. It’s a cleaning tool.
Threshold Angle (spinner): establish the maximum angle allowed between segments for removing vertices.
Make Linear Segments (button)
Convert all segments in selected shapes to linear and vertices to corner type.

Basic Shape Parameters: Spline Interpolation
In this section you can control the basic shape interpolation for all the selected shapes. They are the same parameters you can find in any shape, but here you change them for all the selected shapes simultaneously in a single place.
Show vertex ticks (checkbox)
This option expose all the vertices of the selected shapes on screen. Very useful to see the changes in the segmentation while you apply the subdivision functions.
Undo / Revert Actions
These 2 buttons at the bottom of the UI help you revert the changes you recently made with Spline Refiner.
This is a custom undo system, since 3dsMax does not natively support undo for spline operations.
Undo (icon button): undo the very last action.
Revert Actions: reverts all the changes made with Spline Refiner on the selected shapes since you ran the plugin.
This is a simple yet powerful plugin to speed-up your workflow and make your life easier.
For further information please see Spliner Refiner’s Manual.
If you need help or have any consultations or suggestions to make us, please don’t hesitate to write us through this Contact Form.
Enjoy Spline Refiner!
