Index
- Version Requirements / License / Installation
- TurboSplines Overview
- Creation section
- Edition section
- Animation section
- Tools section
- Help & Tutorials
- Contact/Support
Version Requirements
3dsMax 2012 and higher.
TurboSplines has been tested succesfully on 3dsMax 2012 to 2024. It should also work properly on future versions. However, if you experience any issue, please report it to contact@splinedynamics.com
License
With every purchase you get a lifetime license. It’s a node-locked license.
The Regular License lets you use the product in 2 different workstations. It comes with 2 license keys (1 domain per key).
The Corporate License allows you to activate the plugin on up to 10 workstations. It comes with 2 license keys (5 domains per key).
You will get free upgrades for the same version of the product.
Installation
- Unzip the content of the .zip file and then drag the “.mzp” file onto one of your viewports in 3ds Max . The plugin automatically installs itself.
- A dialog called “Software Activation” pops-up. Enter your license key in the text field. (You received a license key by email when you purchased the product).
- If the license key is correct, TurboSplines will start.
- To add the plugin to a toolbar, go to the Menu > Customize > Customize user interface…
- Go to the “Toolbars” tab and pick the category “Spline Dynamics”.
- The plugin’s name (“TurboSplines”) must be listed there. Just drag it onto a toolbar and you’re done!
TurboSplines Overview
Introduction
TurboSplines plugin for 3dsMax will help you create and manage multiple spline wrapping animations really fast.
This tool automatically assigns Path Deform modifiers to preset or custom meshes and helps you quickly produce many spline-driven animations, which you can easily control from its friendly interface.
Make growing splines, animated cables, wires, ropes, ribbons, moving tentacles, branches, worms, etc.
TurboSplines uses 3dsMax standard modifiers and geometry, so you can edit your meshes and animations without needing the plugin.
This tool is ideal for artists and professionals working in CG Animation, Motion Graphics & VFX.
How to use the plugin
TurboSplines’ workflow involves the following tasks:
- Prepare the splines you will use as paths to drive the objects’ deformation.
- Load those paths in TurboSplines.
- Set the type of mesh to create and other features at TS Creation section.
(If you are just modifying existing TS meshes, you should skip all the previous steps) - Build (or rebuild) the geometry with TurboSplines.
- Edit meshes’ aspect by tweaking TS parameters.
- Animate the path deformed meshes at TS Animation section.
Another possible workflow is starting with a scene with some renderable splines that you already designed. Then, convert them to TS meshes and animate them with TurboSplines.
Important note: The plugin can only edit and manipulate spline-wrapped meshes created by its own methods (called TS meshes). You cannot use it on meshes with a standard Path Deform modifier that you assigned manually. However, you can modify TS meshes without needing the plugin. They have no plugin dependency.
Main Sections
TurboSplines UI has 5 big tabs wich correspond to its main sections: Creation, Edition, Animation, Tools and Help.
![]()
At the Creation section, you create and assign geometry to paths for deformation. You can also modify (rebuild) meshes created with TurboSplines.
At the Edtion section, you adjust the path deformed meshes’ parameters such as radius, scale, segmentation, taper, rotation, twist, stretch, path percent and others. It is also possible to apply Variation on the same parameter to multiple meshes. All the parameters at this section are animatable.
The Animation section lets you quickly animate many spline-deformed meshes along their paths, defining a start time, length of animation, offset and variation, easing, etc. You can also modify and delete existing animations.
The Tools section contains some useful tools to complement TurboSplines functions and speed up your workflow.
The Help section includes a Quick Start tutorial, links to the TurboSplines’ tutorials area on SplineDynamics website and other helpful links. It also shows the credits for the plugin.
Creation section
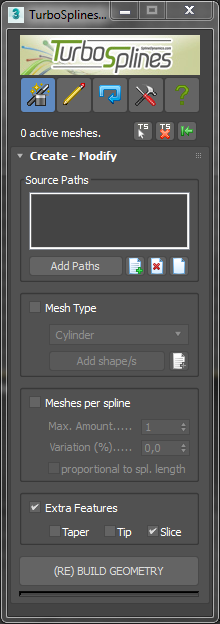
The image on the left shows the Creation section. Before explaining each item of this section in detail, we’ll describe the porpose of the little icon buttons and the text right below the main tabs.
The text on the left will show the number of active TS meshes (i.e. “3 active meshes”). This means how many path deformed objects created with TurboSplines are there selected.
The first little button lets you select all TS meshes in scenes. The second one will delete all TS meshes in scene.
The last one will reset all the active section’s parameters to its default values. (Attention! If you have TS meshes selected, this last action will affect their properties)
Source Paths (parameters group)
In this area you load the splines/paths for path deforming. The buttons below the list box let you add selected paths to the list, open a ‘select by name’ dialog, remove selcted names from the list or clear the whole list.
If you load non-editable splines or shapes, the plugin will warn you it will convert them to editable splines. If you load a shape with multiple splines, the plugin will separate every single spline.
Mesh Type (parameters group)
At this area you can choose whether to use custom or predefined meshes. There are 6 kind of meshes: the first 4 are the predefined meshes that TurboSplines can automatically create: Cylinder, Capsule, Box and Ribbon. The advantage of using these meshes is that you can modify (and animate!) their basic parameters (radius, sides, segments, height) directly from the plugin’s UI, at the Edition section.
The Profile and Mesh options turn the buttons below the dropdown list enabled for you to load your custom shapes or meshes. Choosing ‘Profile’ lets you load profile shapes wich TurboSplines will extrude along the paths. Choosing ‘Mesh’, you can load your own objects to be spline-deformed.
Both Profile and Mesh options will create referenced meshes. That means you will be able to modify the original shape/mesh and changes will be reflected on all the deformed duplicates.
Meshes per Path (parameters group)
If you want to assign more than one mesh to each of the paths, then configure the settings on this area. TurboSplines will create the specified number of duplicates of the chosen mesh type for each path and distribute them evenly.
Amount: number of duplicates per path.
Variation (%): Percent of variation of the previous parameter.
Relative to path length (checkbox): if marked, the highest number of duplicates per path will be applied to the longest path. The height of a single mesh on that path will be use as reference for all mesh duplicates. Then, each path will get an amount of meshes proportional to its length.
Extra Features (parameters group)
TurboSplines can assign additional scripted modifiers to TS meshes for you to refine the meshes’ aspect and expand the animation possibilities. All the parameters for these modifiers are controllable and animatable from the TS Edit section.
There are 3 checkboxes:
Taper: adds a Taper modifier (vey useful for creating tentacles-like look). Not applicable for custom meshes types.
Tip: creates a tip at the end of the path-deformed mesh by adding some scripted modifiers. There are various parameters to play with.
Slice: adds two scripted Slice modifiers that interactively trim the portions of the mesh beyond the ends of the path. Also assigns a Cap Holes modifier to close the holes. (Very handy to avoid unwanted distortions of the mesh when animating path percent parameter)
Button “(RE) BUILD GEOMETRY”
Pressing this big button at the bottom of the rollout will perform the actions to create (or modify) the required geometry. If one or more TS meshes were selected, the plugin will apply the necessary changes to them. Otherwise, it will use the loaded paths to build new TS meshes.
About area-enabling checkboxes
At Creation and Animation sections there are different areas that you can enable or disable by ticking a checkbox on the top-left corner of each area. If you are creating meshes (Creation section) or animations (Animation section) and you don’t tick an area’s checkbox, the plugin will use the default settings for that area. If you are modifying meshes or animations, and you don’t want to change some properties or animations on the selected meshes, then you should disable the areas wich refer to those parameters.
As a general rule: marked checkboxes will cause those parameters to change; unmarked ones will keep them default or unchanged.
Edition section

At this section you can view, edit and animate all TS meshes’ parameters. You can modify a single mesh at a time or multiple meshes at once, applying variation on certain parameters.
This is an interactive view. It displays the parameters of the currently selected TS meshes. If more than one mesh is selected, it shows average values.
To animate the parameters, just use the standard 3ds Max’s Auto Key (or Set Key) button method.
Copy, Paste and Refresh (buttons)
There are 3 little icon buttons at the top left of the Parameters rollout.
Copy: copy the parameters from the selected TS mesh. The parameters that TurboSplines retains in memory are all those shown in these section.
Paste: paste the copied parameters to all the selected TS meshes.
Refresh: force the plugin to update the rollout to reflect the parameters of the current active meshes.
Basic Parameters / Taper (spinners)
Radius/Scale: this is a dropdowlist to in which you can choose to use either Radius or Scale parameter to control the dimensions of your meshes. Both are equivalent, but it’s more intuitive to use Radius if you are working with Cylinders or Capsules, and Scale for other type of meshes. On TurboSplines predefined meshes and those created using Profile shapes, it will affect only the width (or diameter) of the mesh. On custom meshes will perform a uniform scale.
Sides: change the number of sides on Cylinder and Capsule meshes. (Does not affect other type of meshes)
Segments (%): change the amount of height segments on predefined meshes and extrusion segments on Profile mesh type. The value is expressed in percentage of segments, where 100% means the mesh has as many height segments as the lenght of the path (rounded to an integer).
Height (%): the percentage of height of the mesh in relation to the length of the path. (Does not affect custom meshes)
Taper: controls the amount parameter of the TS Taper modifier, if applied.
Invert Taper (checkbox): inverts the Taper effect.
Path Deform Parameters (spinners)
These parameters control the Path Deform (WSM) modifier in TS meshes.
Rotation and Twist have the exactly same effect as changing them in the modifier. They affect the rotation and twist of the mesh along the path and they are expressed in angles.
Stretch (%): stretches the mesh along the path. It’s expressed in percentage, where 100% means scale=1 in mesh’s local Z axis.
Path Percent (%): It’s equivalent to the modifier’s parameter but it’s expressed in percentage, where 100% means the mesh is placed at the beginning of the path and it’s completly distorted by the path’s influence.
Applying Variation
TurboSplines has the power of controling multiple path deformed meshes at the same time. lt lets you change some parameters and keep others, and apply variation wherever you need, in order to make your scene look more natural and appealing.
The Apply Variation button works together with the Variation percent spinner and the option buttons below it, and with the checkboxes on the right of each parameter. You can add variation to any of the prevoius parameters described. To add Variation to a specific parameter, do the following:
- Select the TS meshes to modify.
- At the Edit Section, tick the checkbox on the right of those parameters for wich you want to add some variation to.
- Set the percent of Variation on the spinner.
- Optionally, set the option buttons to specify whether to apply the variation to the spinner value or to the current object’s parameter.
- Press Apply Variation button
Important Note: If you have many TS meshes selected, and you change a parameter without marking its variation’s checkbox, that property will change to the same value in all meshes. To increase or decrease the value of the same parameter on many meshes, but keeping the variation, you need to tick the variation’s checkbox for that parameter first.
This way, for example, you can animate a lot of meshes moving along a single path, keeping their distance, by simply changing the Path Percent parameter (with its checkbox ticked).
Tip Parameters
This area will be enabled only if at least one of the active TS meshes were created with the Extra Features‘s option ‘Tip‘ marked (and the corresponding modifiers were assigned to it). You can turn on/off the tip feature on a mesh by ticking this area’s checkbox.
Tip Length: adjusts the length of the tip. (It is controlled by a scripted Slice modifier called “TS Slice Tip”)
Taper and Curve parameters change the taper and curvature of the tip. (They work together with the “TS Taper Tip” and “TS Vol. Select” modifiers)
Slice Start/End Parameters
TurboSplines can interactively trim the portions of the distorted mesh wich extend outside the path. This area controls that characteristic and will be enabled only if at least one of the active TS meshes were created with the Extra Features‘s option ‘Slice’ marked (and the corresponding modifiers were assigned to it).
Slice Start checkbox: turns on/off the trimming of the portion of the mesh laying before the first knot of the path.
Slice End checkbox: turns on/off the trimming of the portion of the mesh laying after the last knot of the path.
Slice End position (%): this spinner changes the position of the Slice End plane (“TS Slice End” modifier). This control is animatable and is great to make a ‘masking” animation, where the mesh is being revealed progressively along the path.
Cap Holes checkbox: turns on/off the “TS Cap Holes” modifier.
Animation section

At this section you can quickly and easily create and edit animations along path for your TS meshes. Some areas of this section can be activated o deactivated by turning on/ff the corresponding area’s checkboxes. Active areas will influence on those parameters; inactive areas will keep them default or unchanged.
Animation Type (parameters group)
There are 3 types of Animation TurboSplines can automatically create for you: MOVE, GROW, REVEAL.
There’s a dropdown list to choose between them.
MOVE (path percent): to animate a movement along the path. It generates keyframes on the Path Percent parameter of the “Path Deform” modifier.
GROW (stretch): to make a mesh ‘grow’ along the path. It creates keyframes on the Stretch parameter of the “Path Deform” modifier.
REVEAL (slice): to make a ‘masking’ effect, where the mesh is being revealed progressively along the path. It works animating the position of the Slice Plane subobject of the “TS Slice End” modifier.
Delete other types checkbox: indicates whether to leave or delete other types of these 3 possible animations if already exist on the current mesh/es.
Start Time (spinner)
If this area’s checkbox is ticked, the spinner specifies a starting frame for the animation to be created for all the selected TS meshes. If it’s unchecked, TurboSplines will use 3dsMax’s first frame of the current animation range in your scene to create new animations. Or will keep the current starting keyframe for each of the meshes, in the case you are modifying existing animations.
The first keyframe of every animation depends on this parameter and can vary if you also set an offset at the ‘Animations Order / Offset’ area.
Single Animation Length (parameters group)
Anim. Length (f): the length of a single animation, specified in frames.
Variation (%): percentage of variation that will affect the previous parameter.
Relative to path length (checkbox): if checked, the Anim. Length parameter will be taken as the maximum length for a single animation and will be applied to the mesh with the longest path. All the other animation lengths will be proportional to their own paths. This way you can make all meshes to move along the path at the same velocity, no matter the length of each path.
Animation Order / Offset (parameters group)
If you have many similarly animated meshes in your scene, you can add a bit of chaos to make them appear more natural. You may also want to establish some order of appearance or hierarchy between them.
To shift your animations, you can set the Offset parameters. To define an order for them, you have the Sequential order options.
Sequential order (checkbox): if checked, the dropdownlist below it turns enabled, so you can choose what kind of order you want to apply to your animations. Also the 2 spinners change their names for you to set Overlapping values instead of Offset values.
Type of order (dropdown list): There are 5 types of sequential order to choose from:
1. randomly picked: the animations will show in a random order.
2. selection order: if you go selecting your meshes one by one in the desired order, this option will make your animations show following that order.
3. by name: order the animations by object’s name. Very useful for meshes that are numbered sequentially.
4. current order: for non-animated meshes, this option will behave the same as selection order option. For already animated meshes, it will keep the current order of the animations. (This way you could change only the Overlapping parameters but keep the actual order)
5. invert current: inverts the current order of the animations. If there are no animated objects, it will invert the current selection order.
If sequential order is unchecked (default state), the spinners in this area will be:
Min.Offset (f): minimum offset to apply to the animations (in frames).
Max.Offset (f): maximum offset to apply to the animations (in frames).
If sequential order is checked, the spinners will be:
Min.Overlap. (f): minimum range of time the animation sequences will overlap (in frames).
Max.Overlap. (f): maximum range of time the animation sequences will overlap (in frames).
Path Percent (parameters group)
There are cases in wich you will not want your meshes to start their animation at the beginning of the path (0%) or to finish at the end of it (100%).
The parameters in this area let you set initial and final path percent values for animations along the path.
Note: path percent in this case is NOT referring exclusively to the parameter in “Path Deform” modifier. It refers to a percent of animation along the path, wich could be either a Move, Grow or Reveal type of animation.
Initial Min. (spinner): minimum path percent value at wich the animations will start (in frames).
Initial Max. (spinner): maximum path percent value at wich the animations will start (in frames).
Final Min. (spinner): minimum path percent value at wich the animations will end(in frames).
Final Max. (spinner): maximum path percent value at wich the animations will end (in frames).
Easing (dropdown list)
With this control you can set the easing for your animation to: linear, ease in, ease out, ease in/out. This will change the In/Out Tangents of the animation curves.
Delete All Animation (button)
Pressing this button you delete all animations along path (Move, Grow, Reveal) in the selected TS meshes.
CREATE / MODIFY ANIMATION (button)
This big button at the bottom of the rollout will perform the changes you have set at the Animation section. If the selected TS meshes do not have animation along path, it will create the animation. If they have, it will modify the animation according to your settings.
Tools section

Convert from Renderable Splines (button)
This function is really handy and time-saver. A single click on this button will convert all the selected renderable splines to animatable TS meshes.
That means, if you have designed your scene using renderable splines (e.g. to make pipes, cables, etc) and then you need to animate them growing, you just press this button and start animating.
For every renderable spline, TurboSplines will try to replicate the original form as accurately as possible and assign the same wirecolor and material. The only condition is the splines should have the “Enable in Viewport” property active.
Note: if your renderable splines are set as rectangular, the plugin will produce Box type TS meshes, but both sides of the box will have the same size (taken from the width parameter of the renderable spline). If the splines had different length than width, you will need to adjust the length parameter manually at the base object (Rectangle) of every TS mesh.
Add TurboSmooth Modifier (button)
There may be situations where you have decided to work with organic forms and therefore you used path deformed boxes with a TurboSmooth modifier assigned on top. Or you need to assign a TurboSmooth modifier to a TS mesh for whatever reason.
In these cases, if you created your TS meshes with the Extra Features Slice or Tip, and you assign a TurboSmooth modifier on top of the stack, you will see an unexpected distortion on the ends of the mesh. That is because the TS modifiers are interfering with the TurboSmooth.
To solve that, you need to place the TurboSmooth right below all the TS Extra Features’ modifiers.
This function will do that for you (with a single click!) on all the selected TS meshes.
Helixator (button)
This button opens the Helixator tool dialog. This tool is explained in detail at the end of this section.
Bake Anim.to Mesh Sequence (button)
WARNING! This tool could generate a huge amount of meshes on your scene and should be used only in specific situations and very thoughtfully.
In some occasions, you may need to bake your path deform animations in order to apply local space modifiers on top of your meshes.
Another situation where baking your animations helps, is the case of having a few path deformed meshes but with a lot of modifiers applied. That consumes memory and increse the render times, so baking the animations will save you render time.
For those cases, there is this tool. It works this way:
1. Creates one snapshot mesh for every frame of every animated TS mesh selected.
2. Numbers all snapshots of a TS mesh sequentially and place them into a new layer. (One layer per TS mesh)
3. Animates the visibility of every snapshot so if you play your animation it will show each snapshot only on the corresponding frame.
That way the entire scene animation will be recreated but having static meshes instead of deforming ones. Then you should delete your TS meshes from the scene.
After that you can apply instanced modifiers to all snapshots at the same time to further modify them. Or just try rendering some frames to see if the render time has been reduced.
Path Changes (parameters group)
In this area you can find tools for changing the path for a TS mesh, readapt the mesh to the new path and reload TurboSplines‘s UI parameters.
Pick New Path (button): lets you pick a new spline path for the selected TS mesh and automatically reassigns it.
Update path-mesh relation (button): recomputes the TS parameters after editing a path, restoring the relationship between the path and the mesh.
Reset mesh height/segments (checkbox): if checked when the above button is pressed, it will reset the height and segments parameters for the TS mesh and update them at TurboSplines‘s Edit section.
Remove Extra Features (parameters group)
If you want to delete specific TS modifiers from TS meshes (created with the Extra Features‘ options at the Creation section), you could do it by hand but we strongly recommend to do it with this simple tool. It can handle many TS meshes at the same time.
Just tick the checkbox/es of the feature/s you want to remove and press ‘Delete Modifiers’ button.
Helixator tool
This tool can convert any spline paths to helical paths with a few settings.
It’s ideal to make spiral cables and springs from simple splines in just seconds.
Helixator UI controls:
Select Source Spline/s (button): opens a ‘select by name’ dialog for you to choose the splines to convert.
Turns (spinner): number of turns for the helices.
Proportional to path length (checkbox): if checked, the number of turns of every helix will depend on the length of the spline. The Turns value will be used as the highest number of turns and will apply to the longest path. This way, all helices will look as pieces of the same kind of object (equally stretched).
Start Radius (spinner): initial radius for the helices.
End Radius (spinner): final radius for the helices.
CW/CCW (radio buttons): direction of helices. Clockwise / Counterclockwise.
Variation (%): percentage of variation to apply to turns, radiuses and direction.
Vertices per Turn (spinner): number of knots the helices will have for each turn. (It’s kind of a “resolution” parameter.)
Create Helices (button): creates the helices with the specified parameters.
Help section

This section provides useful information, tutorials, links and a tool to activate your software’s license after purchasing TurboSplines plugin.
Quick Start Tutorial (button)
Opens a window showing a simple tutorial for you to start learning TurboSplines.
Links
Some helpful links to online tutorials and documentation about this plugin.
(Here you can find Online Tutorials and Video Tutorials)
Activate your License (button)
Opens the tool to perform the License Activation. You will need one of your license keys you received by email after purchasing TurboSplines.
About
TurboSplines plugin credits.
Contact / Support
If you experience any issues using this plugin or need help, please check first the TurboSplines Forums. Maybe you can find the solution there and save precious time.
For custom support or making suggestions or business proposals, please don’t hesitate to contact us through this Contact Form.
You can also write us directly to contact@splinedynamics.com.
All feedback is greatly appreciated. We will try to answer all your inquiries as soon as possible.
Enjoy TurboSplines!
