Posted on Leave a comment

Spline Refiner Tutorial: The Basics

Spline Refiner 3ds Max plugin. Always uniform segmentation without losing any detail. Preserves the exact orignal shape and vetices. Spline Refiner is a 3ds Max productivity tool that features a Smart Spline Subdivision solution to get evenly distributed vertices on curves.

General Considerations

Spline Refiner is a 3dsMax productivity tool thought to automate and speed-up the tedious task of subdividing all the segments of a shape manually, trying to achieve a general uniform vertex distribution along the splines.

This is not a normalization tool, like 3dsMax’s Normalize Spline modifier. It’s a Smart Subdividing tool.
The goal of this plugin is to get an even segmentation of the splines while preserving all the original vertices and shape intact.

Since this tool was ment to use at a final stage of the curves edition, it works better when provided with clean shapes, without overlapping vertices or other problematic issues, that may cause undesired results.

Spline Refiner works on any type of shape but will convert the base object to Editable Spline (keeping all the modifiers intact). It supports shapes with modifiers assigned (even geometry builders like Extrude modifier), because it works on the base object level.

The plugin can operate on multiple shapes simultaneosly, fast and efficiently. It takes only a few seconds to process hundreds of splines.

To start working with your selected shapes in Spline Refiner, the first thing we suggest is to turn on ‘Show vertex ticks’ (at the bottom of the plugin’s UI). This way you will be able to see all the changes in segmentation in realtime.

Start trying Spline Refiner and play with the parameters of Equalize Subdivision tool. The following is a description of all the tools in the plugin’s UI.

Equalize Subdivision
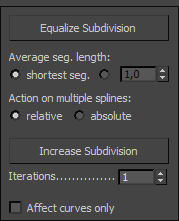
This is the key tool of this plugin. It analyzes every segment of the spline/s and, according to the provided parameters, determines the best way to get the most uniform subdivision possible, without altering the existing shape and vertices.

It doesn’t use a fix segmentation value. Instead, it takes an approximate (average) segment length, wich you can choose to be calculated automatically (using the length of the shortest segment in spline) or set a custom value.

If you are working with multiple splines and you want to have a uniform subdivision across all splines, then choose the options shortest seg. and absolute.
If you want the plugin to calculate a specific subdivision for each spline, then choose the options shortest seg. and relative.


The image above clearly shows how the parameters of Equalize Subdivision work. (‘Automatic’ refers to choosing the option ‘shortest seg.‘ as the average segment length.)

Increase Subdivision

This tool divides every segment of the splines in 2 halves, doubling the general segmentation.
The Iterations parameter sets how many times the function will be recursively applied.

The ‘Affect curves only’ checkbox it’s an important feature that affects both Equalize Subdivision and Increase Subdivision functions.
If active, the tools will subdivide only the curved parts and leave straight lines intact. Very powerful feature!

Additional Tools
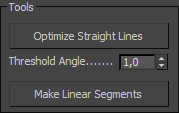
Optimize Straight Lines (button)
Removes all unnecessary vertices from straight lines. It’s a cleaning tool.
Threshold Angle (spinner): establish the maximum angle allowed between segments for removing vertices.

Make Linear Segments (button)
Convert all segments in selected shapes to linear and vertices to corner type.

Basic Shape Parameters: Spline Interpolation
In this section you can control the basic shape interpolation for all the selected shapes. They are the same parameters you can find in any shape, but here you change them for all the selected shapes simultaneously in a single place.

Show vertex ticks (checkbox)
This option expose all the vertices of the selected shapes on screen. Very useful to see the changes in the segmentation while you apply the subdivision functions.

Undo / Revert Actions

These 2 buttons at the bottom of the UI help you revert the changes you recently made with Spline Refiner.
This is a custom undo system, since 3dsMax does not natively support undo for spline operations.

Undo (icon button): undo the very last action.

Revert Actions: reverts all the changes made with Spline Refiner on the selected shapes since you ran the plugin.


This is a simple yet powerful plugin to speed-up your workflow and make your life easier.

For further information please see Spliner Refiner’s Manual.
If you need help or have any consultations or suggestions to make us, please don’t hesitate to write us through this Contact Form.

Enjoy Spline Refiner!

Share
Posted on Leave a comment

Spline Combiner Booleans: Limitations & Workarounds

Boolean operations involve complex math. Boolean engines are very complicate pieces of code and there is no perfect algorithm for this task.

Spline Combiner uses 3dsMax’s ProBoolean engine to perform boolean oprations between splines. This functions work generally very good, but there are some exceptions.

There may be occasions in wich Spline Combiner‘s Boolean Splines tool cannot resolve the boolean operation properly. For example, in some cases after the process, all the shapes disappear or the resulting shape is wrong. Don’t panic! This is not an error. It’s a known limitation and it happens just in particular cases. We will point those cases and show you how to solve them in a few steps.

The image above shows 3 cases in wich the Boolean Union operation fails and how to use Spline Combiner’s Detect Intersections tool to workaround this.

The most problematic situations, as you can see, are those involving overlapping vertices and lines between shapes.

As a general rule, to overcome these cases, you can use the Detect Intersections tool. The steps are the following:

  1. Select the shapes
  2. Open Detect Intersections rollout
  3. Tick ‘Between different shapes’
  4. Choose ‘Split’ option and ‘Detach elements’
  5. Press ‘DETECT INTERSECTIONS’ button. The plugin breaks the splines apart by intersections, detaching all curves.
  6. Delete the unwanted parts manually
  7. At the Tools rollout, press ‘Attach Selected’ and ‘Weld Vertices’

Ready!

This method and works for almost all the cases, since the algorithm Spline Combiner uses for detecting intersections is very accurate and effective.

Try it! If you have any doubts or consultations please leave a comment down here or write us through this Contact Form.

Cheers!


Share
Posted on Leave a comment

Spline Combiner: Handling Spline Intersections

Hi guys!

In this tutorial we’ll see how to deal with spline intersections in 3ds Max, with the help of Spline Combiner‘s Intersections Detection tool.

3ds Max lacks a ‘snap to intersections’ feature. Besides, all operations between splines (like boolean functions, trimming, etc.) require all splines to be part of the same shape. So, if you need to create new shapes from existing ones, it turns a really time-consuming and inefficient task.

Here’s when Spline Combiner comes in to make your life easier. The plugin can detect all kind of intersections between splines (between different shapes, spline subobjects and self intersections) and then perform a series of actions like placing helpers at intersections, refine the splines or break them and detach them all.

Placing helpers at intersections

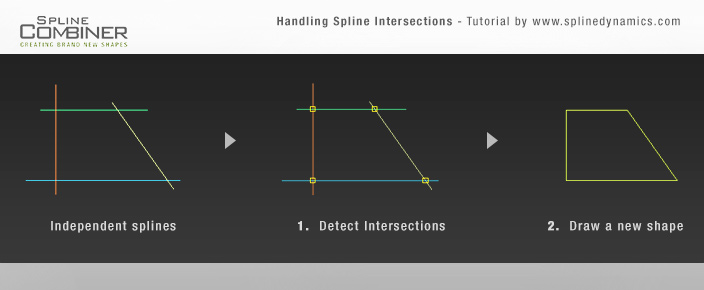
Consider the following situation: you have 4 independent splines, like in the first graphic in the image above. Your goal is to get the shape inscribed between those splines (see the last graphic on the right). For that, since they are all straight lines, the easiest way would be to draw the final shape by snapping to the intersections. Spline Combiner can help us by automatically placing a point helper at each intersection. Let’s start. Prepare a similar scene in 3ds max and follow these steps:

1. Open Spline Combiner, close the first and second rollouts and open the one named Detect Intersections.

2. Select all the shapes you want to find intersections for.

3. In this case, tick only the checkbox labeled Between different shapes.

4. At Action area, select the option None. (No action is needed apart from the intersections detection)

5. At Helpers area, turn on Place helpers checkbox.

6. Then press DETECT INTERSECTIONS.

7. Voila! You now have one helper per intersection. You can change their color and size with the controls in the Helpers area.

8. Turn on 3ds Max snap tool and at the snapping options check only “Pivot“.

9. Now, with the Line tool, draw the final shape. (You can select the helpers through the Named Selection Sets dropdown list in 3dsMax and delete them if you want)

Ready! Nice, quick and simple. 🙂 Practice this method and you’ll see how faster you work this way.

Now we’ll see another method to handle a slightly more complex situation.

Refining or breaking splines at intersections

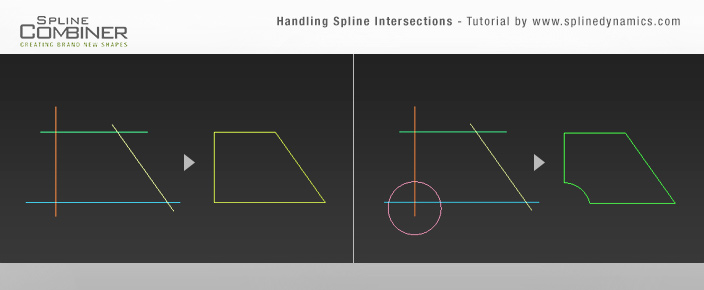
Consider the situation in the first graphic of the image above. There are 5 independent splines. Your goal is to get from them the shape in the last graphic on the right.

Spline Combiner can perform a variety of actions after detecting spline intersections. You can choose either to Refine the splines at those points, to Split (or break) them, or to break and detach them all as new objects.

So, let’s start. Prepare a scene in 3ds Max, containing something similar to the first graphic in the image and follow these steps:

1. Open Spline Combiner > Detect Intersections rollout.

2.  Select the shapes you created.

3. At Action area, check Split option and leave Detach all elements on.

4. Uncheck Place helpers if it is on. Then press DETECT INTERSECTIONS.

5. Once the plugin has finished the task, you will get many individual splines, like you see in the 2nd graphic at the image above.

6. Now just select and delete the unnecessary splines, leaving only the ones that make the final shape.

7. Since the splines are individual objects, you need now to attach them all and weld their vertices. So, go down in the plugin’s UI and open the Tools rollout. Use the corresponding tools Attach Selected and Weld Vertices to complete the task.

Ready! You have now a clean and closed final shape.

Note: If you need to make this exercise but, instead of having different individual splines, you have a single shape containig many spline subobjects and want to keep it that way, you can use the options Splines of same shape and Refine. Then work in subobject mode to delete the leftovers and weld the vertices.

That’s all for now. If you have any doubts or consultations, please post a comment down here or write us through the Contact Form.

Hope you liked it! Cheers!

Share