Posted on Leave a comment

Showcaser for 3ds Max: Create Stunning Animated Presentations with Ease

Showcaser 3ds Max plugin

Showcaser 3ds Max plugin

Creating animated presentations in 3ds Max has never been easier. Showcaser is a powerful plugin designed to help 3ds Max users create professional-quality animations of scenes, products, or models with minimal setup. Whether you’re showcasing a complex scene assembly or focusing on a single model, Showcaser offers a streamlined way to bring your 3D work to life.

Why Showcaser?

Showcaser is perfect for users who want to animate their 3D designs quickly without needing in-depth animation skills. With a few clicks, you can go from a static scene to an impressive animated sequence. Its simple interface lets you arrange objects in a preferred animation order, adjust parameters, and instantly generate keyframes for position, rotation, and scale.

Showcaser offers two main animation modes:

  1. Scene Animation Mode: Animate an entire scene as it assembles, with each object appearing in sequence until the scene is complete.
  2. Model Animation Mode: Ideal for presenting products or models, Showcaser sequentially reveals each element on screen, adding entry and exit animations for a dynamic presentation.

For added flexibility, Showcaser supports both standard 3ds Max objects and third-party plugins, including proxies, making it an adaptable choice for all types of users.

Features that Make Showcaser Stand Out

Showcaser is loaded with features to help you animate with ease and precision:

  • Multiple Animation Sequences: You can create several animated sequences for a single scene, allowing you to showcase different aspects of your design or focus on specific elements.
  • Flexible Object Loading and Ordering: Load objects by manual selection, name, layer, or group, and define the animation order based on name, size, or position, or set a custom order.
  • Animation Variety: Choose from multiple animation types (movement, rotation, scale, appearance/disappearance) and customize easing (linear, ease in/out, spring).
  • Turntable Animations: Generate a turntable animation with customizable parameters or load a custom turntable model for professional model presentations.
  • Group Animations: Showcaser allows you to animate specific groups of objects together, based on criteria such as size, layer, or user-defined sets, creating more organized animations.
  • Adjustable Timing: Configure start and end times, control entry and exit durations, and overlap animations for a smooth flow.
  • Keyframe Control and Flexibility: Showcaser creates standard keyframes, so you have full control and can adjust animations manually in 3ds Max without dependency on the plugin.

A User-Friendly Animation Tool

Showcaser’s intuitive design and preset library make it accessible for all experience levels. With instant parameter presets and the ability to save custom presets, you can easily replicate animation settings for consistency across multiple projects. Plus, Showcaser’s custom undo function and option to restore the initial scene state make experimenting with animations risk-free.

The Advantages of Showcaser

Showcaser is ideal for 3D artists, designers, and animators who need an efficient tool for creating animated presentations. Here’s why Showcaser stands out:

  1. Simplicity and Speed: Instantly animate scenes or models without needing extensive animation skills.
  2. Professional Presentations: Deliver high-quality, dynamic presentations in fields like CGI, architectural visualization, game art, and industrial design.
  3. Animation Control: Each animated object remains a standard 3ds Max object, allowing for manual edits with 3ds Max’s native tools.
  4. Flexible Export: Showcaser animations are compatible with real-time engines like Unreal Engine, Unity, and Chaos Vantage for game design and virtual presentations.

Ready to bring your 3ds Max projects to life? Try Showcaser today and explore how simple, powerful animations can elevate your 3D presentations.

Showcaser 3ds Max plugin

Share
Posted on Leave a comment

TurboSplines for 3ds Max: Effortless Path Deform Animations for CG Artists

TurboSplines 3ds Max plugin

TurboSplines 3ds Max plugin

Creating smooth, spline-driven animations in 3ds Max can be challenging, especially when working with complex paths or multiple meshes. TurboSplines is here to simplify that process. This powerful plugin automates the creation, editing, and animation of path-deformed meshes, making it an ideal tool for professionals in CG animation, motion graphics, and VFX.

Why Choose TurboSplines?

TurboSplines is designed to streamline path deform animations in 3ds Max, enabling artists to produce high-quality animations with minimal effort. Here’s how TurboSplines can transform your workflow:

  • Instant Path Deform Setup: TurboSplines automatically assigns Path Deform modifiers to both preset and custom meshes. In just a few clicks, you can animate splines into dynamic cables, wires, ribbons, tentacles, and much more.
  • Choose Your Meshes: Work with predefined shapes (cylinder, capsule, box, ribbon) or bring in custom profiles and meshes. TurboSplines handles multiple meshes per path, letting you create intricate animations from a single intuitive interface.
  • Enrich and Refine: Add taper, tip, and slice effects to adjust the look of your meshes. Control animations on parameters like scale, height, rotation, twist, and stretch to bring realism and detail to your creations.
  • Copy, Paste, and Customize: Easily copy and paste settings between meshes, apply variation and offset for unique, realistic animations, and manage all parameters from TurboSplines’ user-friendly interface.

The TurboSplines Advantage: Focused Simplicity

Unlike particle systems and other powerful plugins like TyFlow, which are oriented toward visual effects, particle simulations, physics simulations, and fluid dynamics, TurboSplines is exclusively focused on mesh deformation along spline paths. This specialized approach offers a wide range of creation, editing, and animation options through a simple, intuitive interface—without the need to learn a complex, all-encompassing tool. TurboSplines has a quick learning curve, making it accessible for users of all experience levels.

One of TurboSplines’ key benefits is its flexibility: each generated mesh is a standard 3ds Max object, fully selectable and editable. This allows for manual adjustments and precise control over each animated mesh, giving you creative freedom to tweak and refine every detail.

Versatile Animation Options

With TurboSplines, artists can explore various animation styles along a path, including movement, growth, and reveal animations. For users working with complex spline paths, TurboSplines also offers a quick conversion feature to turn splines into custom helical paths, perfect for creating spirals, springs, and cables.

Key Benefits of TurboSplines

  1. Efficiency: Automates repetitive tasks, saving time on each project.
  2. Creative Control: Gives you the ability to control numerous animation parameters from a central interface.
  3. Realism and Variation: Apply offset and variation to create more lifelike animations.
  4. Quick Learning Curve: Ideal for users who need a specialized tool for spline animations without the complexity of particle systems.
  5. No Plugin Dependency: TurboSplines uses 3ds Max standard modifiers, ensuring compatibility with all major render engines without plugin dependency.

TurboSplines is the ultimate tool for 3ds Max users aiming to automate, streamline, and enhance their path deform animations. Whether you’re animating growing vines, trailing light effects, or spiraling cables, TurboSplines gives you the flexibility and control to bring your ideas to life faster than ever.

Ready to elevate your animations in 3ds Max? Explore TurboSplines today and see how easy it can be to add professional-grade path deform animations to your workflow.

TurboSplines 3ds Max plugin

Share
Posted on Leave a comment

TurboSplines Tutorial: Creating Helix Coils

This external tutorial posted by Elara Systems encompasses thorough instructions for creating Helix Coils using the TurboSplines and Path Deform plugins.

It goes over strategy for pipeline planning when using a complicated modifier stack when combining multiple external plugins. It’s a tutorial for a more advanced 3DS Max users and also requires you to have the plugins listed above.

Click on the image below to watch it on Youtube:

Share
Posted on Leave a comment

Spline Combiner: Handling Spline Intersections

Hi guys!

In this tutorial we’ll see how to deal with spline intersections in 3ds Max, with the help of Spline Combiner‘s Intersections Detection tool.

3ds Max lacks a ‘snap to intersections’ feature. Besides, all operations between splines (like boolean functions, trimming, etc.) require all splines to be part of the same shape. So, if you need to create new shapes from existing ones, it turns a really time-consuming and inefficient task.

Here’s when Spline Combiner comes in to make your life easier. The plugin can detect all kind of intersections between splines (between different shapes, spline subobjects and self intersections) and then perform a series of actions like placing helpers at intersections, refine the splines or break them and detach them all.

Placing helpers at intersections

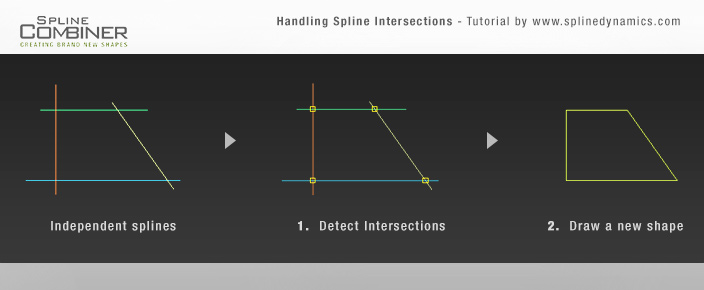
Consider the following situation: you have 4 independent splines, like in the first graphic in the image above. Your goal is to get the shape inscribed between those splines (see the last graphic on the right). For that, since they are all straight lines, the easiest way would be to draw the final shape by snapping to the intersections. Spline Combiner can help us by automatically placing a point helper at each intersection. Let’s start. Prepare a similar scene in 3ds max and follow these steps:

1. Open Spline Combiner, close the first and second rollouts and open the one named Detect Intersections.

2. Select all the shapes you want to find intersections for.

3. In this case, tick only the checkbox labeled Between different shapes.

4. At Action area, select the option None. (No action is needed apart from the intersections detection)

5. At Helpers area, turn on Place helpers checkbox.

6. Then press DETECT INTERSECTIONS.

7. Voila! You now have one helper per intersection. You can change their color and size with the controls in the Helpers area.

8. Turn on 3ds Max snap tool and at the snapping options check only “Pivot“.

9. Now, with the Line tool, draw the final shape. (You can select the helpers through the Named Selection Sets dropdown list in 3dsMax and delete them if you want)

Ready! Nice, quick and simple. 🙂 Practice this method and you’ll see how faster you work this way.

Now we’ll see another method to handle a slightly more complex situation.

Refining or breaking splines at intersections

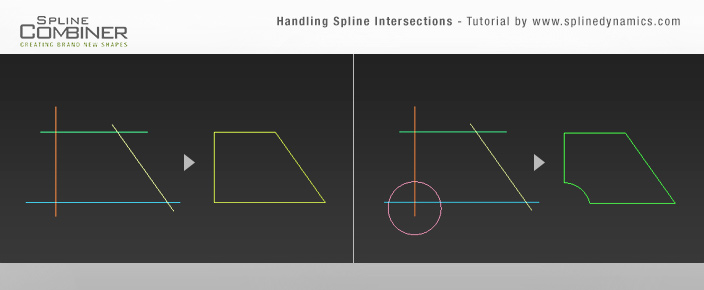
Consider the situation in the first graphic of the image above. There are 5 independent splines. Your goal is to get from them the shape in the last graphic on the right.

Spline Combiner can perform a variety of actions after detecting spline intersections. You can choose either to Refine the splines at those points, to Split (or break) them, or to break and detach them all as new objects.

So, let’s start. Prepare a scene in 3ds Max, containing something similar to the first graphic in the image and follow these steps:

1. Open Spline Combiner > Detect Intersections rollout.

2.  Select the shapes you created.

3. At Action area, check Split option and leave Detach all elements on.

4. Uncheck Place helpers if it is on. Then press DETECT INTERSECTIONS.

5. Once the plugin has finished the task, you will get many individual splines, like you see in the 2nd graphic at the image above.

6. Now just select and delete the unnecessary splines, leaving only the ones that make the final shape.

7. Since the splines are individual objects, you need now to attach them all and weld their vertices. So, go down in the plugin’s UI and open the Tools rollout. Use the corresponding tools Attach Selected and Weld Vertices to complete the task.

Ready! You have now a clean and closed final shape.

Note: If you need to make this exercise but, instead of having different individual splines, you have a single shape containig many spline subobjects and want to keep it that way, you can use the options Splines of same shape and Refine. Then work in subobject mode to delete the leftovers and weld the vertices.

That’s all for now. If you have any doubts or consultations, please post a comment down here or write us through the Contact Form.

Hope you liked it! Cheers!

Share
Posted on Leave a comment

Spiros tutorial: Making jewelry

In this tutorial we will learn how to model some ornaments in 3dsMax with Spiros, based on spirals and torus knot shapes, to make jewelry objects.

First, we’ll see how to create a bracelet with a triangular spiral shaped decoration. Secondly, we’ll learn how to make two different kind of pendants from torus knot shapes.

Before starting, let’s see which are the most common methods in 3dsmax to turn a spline curve into a volumetric mesh:

  • Make the spline renderable (Editable Spline properties)
  • Apply a Sweep modifier
  • Use Loft compound object
  • Use Path Deform modifier
  • Extrude Along Spline (tool from Editable Poly)

In this tutorial we use a different method for each of the three cases, but you can use the method that better fit your needs, or the one you are more comfortable with.

Making the bracelet

As you see in the image above, the bracelet’s triangular decoration was made starting with a simple spiral object created with Spiros.

Here’s the process:

1. In 3ds Max, open Spiros and create a spiral shape on the top viewport, with the size you like.

2. At the plugin’s UI, set the following values: Turns = 4.0; Knots = 13; Curve type: Line.

3. Now you will have a triangular spiral. Rotate it so that the triangle points upwards.

4. Edit the spline as shown in the image, to make all the sements perfectly parallel and delete the extra segment on the left.

5. Add a Sweep modifier. Use the built-in section called “Half Round” as the profile shape. This will turn the spline into a volumetric mesh.

6. Adjust the Sweep radius so that the mesh does not overlap itself, until it looks similar to the image.

7. Convert the mesh to Editable Poly to clean the geometry, remove undesired parts and add detail wherever you like.

8. Subdivide the mesh or add tesselation to increase the mesh resolution for applying later deformation.

9. Model the tube for the bracelet.

10. Place the triangular mesh on top of the tube and apply a Bend modifier to make the triangle conform to the tube’s surface.

11. Add any necessary details to finish the bracelet, apply materials and you are done!

Making the pendants

Celtic Knot

The first pendant, a celtic knot similar to a flower with 4 petals, was made the following way:

1. In 3ds Max, open Spiros and create a torus knot shape on the top viewport, with the size you like.

2. At the plugin’s UI, set the following values: Foils = 4; Variant = 2; Star/Ring = 6.

3. Scale down the shape in Z axis to make it flatter.

4. Create a rectangle shape to use as the profile section.

5. Apply an Extrude modifier and make a very tall box, with 100 segments for starting. (The advantage of this method over using the Box primitive, is that you can set the number of height segments to a very high value)

6. Apply a Path Deform (WSM) modifier to the box and pick the torus knot as its path. Press “Move to Path”.

7. Go down in the modifiers stack and adjust the Rectangle dimensions to give the knot mesh a reasonable thickness and proportions.

8. At the Extrude modifier parameters, adjust the Amount and Segments until the knot looks closed and with a nice mesh resolution.

9. Zoom in the part of the mesh where the start and end of the knot meet. You will need to make both ends of the mesh match perfectly.
For that, go to the Path Deform modifier and adjust the Twist amount.

10. With 3dsMax snapshot tool, take a snapshot of the mesh. Then convert it to Editable Poly.
Now you can delete or hide the old mesh and path. You will work with the new object now.

11. Weld the start and end of the mesh. Perform some cleaning if necessary and then model any extra details you desire to finish the pendant.
Apply materials/textures and you are done!


5-Pointed Star

The making of the second pendant, a 5-pointed star (or pentagram), will be explained very briefly because the procedure is very similar to the previous objects.

1. In Spiros, draw a torus knot with the following values: Foils = 5; Knots = 5; Curve type: Line. (or choose 5 Point Star preset from the dropdown list)

Tip: You can make Star shapes with the Torus Knot tool by setting the same number in Foils and Knots, and set the Curve Type to line.

2. At the spline parameters, make it renderable in viewport and renderer. Set the section shape as Rectangular and adjust its dimensions as desired.
Now you have the star mesh.

3. Convert it to Editable Poly. Perform some cleaning and then add the necessary detail to the mesh.

4. Model the ring to complete the pendant and then put both pieces together. Apply materials/textures and you are done!

Hope you enjoyed this tutorial. If you have any doubts or consultations you can leave a comment down here or write us through the Contact form.

Cheers!

Share