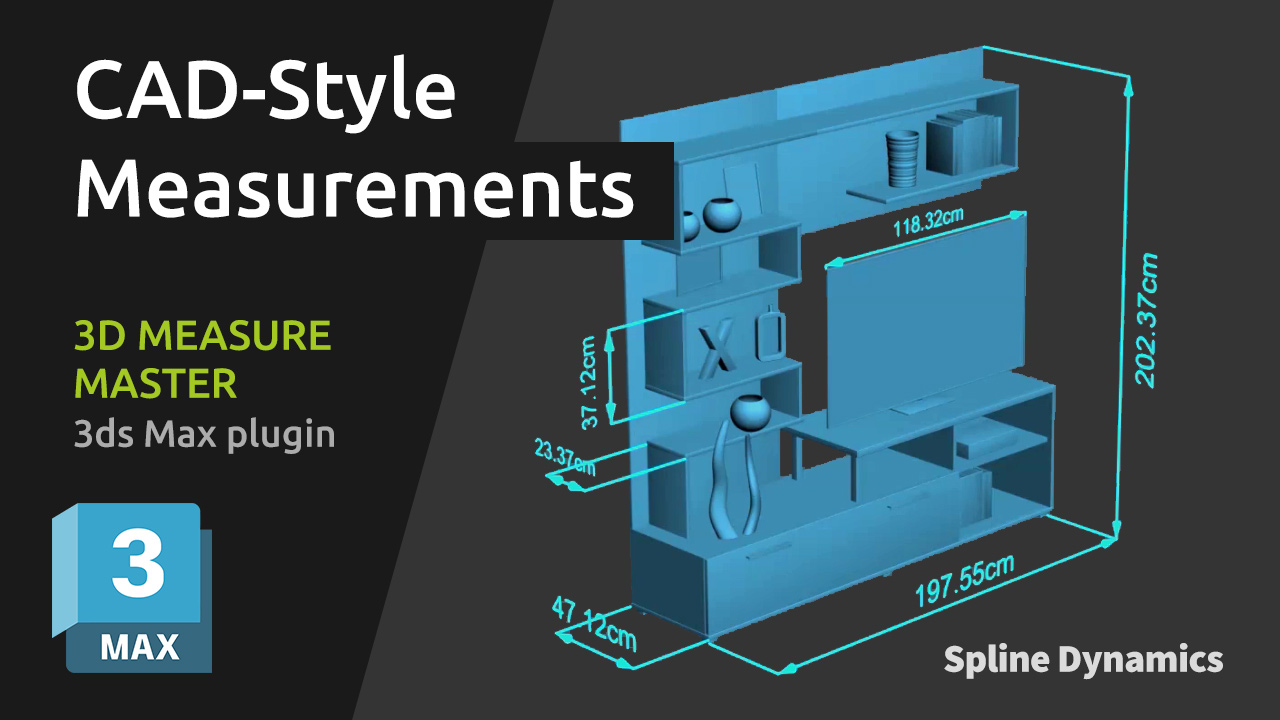
This comprehensive tutorial will guide you through every feature of 3D Measure Master, the professional 3ds Max plugin for CAD-style 3D measurements.
You’ll learn how to use the 5 main measurement tools — Tape, Angle, Radius, Diameter, and Bounding Box — to measure objects directly in your scene with real 3D precision. The tutorial also explains how to adjust global settings (colors, units, spline thickness, text size, text offset and end markers), how to customize per-measure parameters, and how to export all your measurements to a CSV file for documentation or review.
Whether you’re an architectural visualizer, technical modeler, or product designer, this video will help you integrate accurate, clean, and renderable measurements into your 3ds Max workflow.
For a detailed explanation of every tool and parameter, please read the plugin documentation.
Bring more life and variation into your 3ds Max scenes with just a few lines of Maxscript!
In this edition of Maxscript Bits & Tricks, you’ll learn how to quickly randomize the position, rotation, wirecolor, and materials of selected objects. Perfect for creating more natural, less mechanical arrangements in ArchViz, motion graphics, and product visualization projects.
Code snippets
1. Randomize position and rotation of selected objects
Move and rotate selected objects randomly to create more natural distributions. This script supports 3ds max groups.
for obj in selection where obj.parent==undefined do (
    rPos = random -3.0 3.0
    rRot = random -20.0 20.0
    move obj [rPos, rPos, 0]
    rotate obj (eulerangles 0 0 rRot)
)
2. Randomize wirecolor of selected objects
Assign random wireframe colors to each selected object, making it easier to distinguish them in the viewport.
for obj in selection do obj.wirecolor = color (random 0 255) (random 0 255) (random 0 255)
3. Swap materials among selected objects
Mix up the materials of the selected objects randomly without repeating.
selArr = selection as array
matArr = for obj in selArr collect obj.material
for obj in selArr do (
    idx = random 1 matArr.count
    obj.material = matArr[idx]
    deleteItem matArr idx
)
Why use randomization scripts?
Add natural randomness to scenes quickly
Create more believable and organic object arrangements
Speed up look development for ArchViz, design layouts, or product setups
Simplify creative variations without manual tweaking
More productivity tools and scripting for 3ds Max
If you found these tips helpful, be sure to check out our professional plugins and tools for 3ds Max.
In this episode of Maxscript Bits & Tricks, we’ll take a look at some handy Maxscript snippets to help you organize your 3ds Max scenes more efficiently using layers.
Layers are a great way to group, control, and clean up complex scenes — but often, things end up scattered across random layers or grouped in ways that make no sense. These small but powerful scripts will help you fix that in seconds.
Let’s get started!
Code snippets
1. Move all lights and cameras to the Default layer
Sometimes cameras and lights are scattered across various layers, especially when importing scenes from external sources or merging multiple files. Use this simple line of code to send them all back to the “Default” layer:
for o in objects where (superClassOf o)==light or (superClassOf o)==camera do (LayerManager.getLayer 0).addnode o
2. Move all VRay proxies to a new layer
Keeping your heavy VRayProxy assets organized in a dedicated layer is a great way to manage scene complexity. This snippet finds all VRay proxies in the scene and places them in a newly created layer called “VRay_Proxies”:
lay = LayerManager.newLayerFromName "VRay_Proxies"
for o in objects where classof o == VRayProxy do lay.addNode o
3. Hide all layers except the ones of selected objects
Need to focus only on what you’re working on? This script hides every layer in the scene except the ones where your currently selected objects are. Ideal for isolating working sets without changing visibility layer by layer.
arr = for o in selection collect o.layer.name
LM = LayerManager
for i = 0 to LM.count - 1 do (
    lay = LM.getLayer i
    lay.isHidden = (findItem arr lay.name == 0)
)
Why use these layer scripts?
Quickly organize imported or messy scenes
Simplify your Layer Manager
Focus only on what matters in complex projects
Save time in lighting and layout workflows
More productivity tools and scripting for 3ds Max
If you found these tips helpful, be sure to check out our professional plugins and tools for 3ds Max.
Welcome to a new edition of Maxscript Bits & Tricks, our ongoing tutorial series featuring short and powerful Maxscript snippets to boost your 3ds Max productivity.
This time, we’ll focus on light management, one of the key aspects in optimizing and adjusting a scene — especially in large or complex projects.
In just a few lines of Maxscript, you’ll learn how to:
Turn off all lights in the scene except the selected ones
Increase the intensity of selected VRay lights by 50%
Delete lights that are turned off and not contributing to the scene
These quick actions can help speed up lookdev, clean up unnecessary elements, and keep your renders clean and efficient.
Let’s dive right in!
Code snippets
1. Turn off all lights except the selected ones
This quick snippet will turn off every light in the scene except the ones you’ve selected. Very handy when you want to isolate and test the effect of specific lights.
InstanceMgr.MakeObjectsUnique selection #group; for o in lights where not o.isSelected do o.on = false
2. Increase intensity of selected VRay lights by 50%
Use this script to quickly boost the intensity (multiplier) of all selected VRayLight objects by 50%. It works even if they are instanced or unique.
arr = #(); for o in selection where (classOf o)==VRayLight do (if (appendIfUnique arr o.baseObject) then o.multiplier *= 1.5)
3. Delete lights that are turned off
Clean up your scene by removing all lights that are off and not contributing to your render. This helps declutter the scene and improve render prep times.
delete (for o in lights where o.on == false collect o)
Pro Tip: Lights cleanup and adjustment are essential steps in scene optimization — especially in ArchViz, interior renders, and product visualization projects where lighting plays a key role.
More productivity tools and scripting for 3ds Max
If you found these tips helpful, be sure to check out our professional plugins and tools for 3ds Max.