Index
1. Version Requirements
3dsMax 2016 and higher.
3D Measure Master has been tested succesfully on 3dsMax 2016 to 2026. It should also work properly on future versions. However, if you experience any issue, please report it to contact@splinedynamics.com
1.1 License
With every purchase you get a lifetime license. It’s a node-locked license.
The Regular License lets you use the product in 2 different workstations. It comes with 2 license keys (1 domain per key).
The Corporate License allows you to activate the plugin on up to 10 workstations. It comes with 2 license keys (5 domains per key).
You will get free upgrades for the same major version of the product.
1.2 Installation
- Unzip the content of the .zip file and then drag the “.mzp” file onto one of your viewports in 3ds Max . The plugin automatically installs itself.
- A dialog called “Software Activation” pops-up. Enter your license key in the text field. (You received 2 license keys by email when you purchased the product).
- If the license key is correct, the plugin will start.
- To add the plugin’s icon to a toolbar, go to the Menu > Customize > Customize user interface…
- Go to the “Toolbars” tab and pick the category “Spline Dynamics”.
- The plugin’s name (“3D Measure Master”) must be listed there. Just drag it onto a toolbar and you’re done!
2. Overview
3D Measure Master is a professional 3ds Max plugin that lets you measure any element in your scene with true CAD-style precision.
It provides 5 specialized measurement tools to calculate distances, angles, radii, diameters and bounding boxes directly in 3D space — using real geometry instead of 2D overlays.
All measurements are created as editable 3D splines and TextPlus objects, so they remain fully interactive and renderable in your scene.
You can adjust their appearance globally or individually, export all data to CSV, and even render your measurements directly for technical visualization, archviz, or product design presentations.
3. Main Tools
The Main Toolbar gives access to 5 dedicated measurement tools:
- Distance
- Angle
- Radius
- Diameter
- Bounding Box
Each tool is interactive and easy to use:
-
Click to pick one or more points in your scene (depending on the tool).
-
Drag to define the projection or placement of the spline that represents the measure.
-
The measurement will automatically appear as a spline with text showing its numeric value.
While you are using any of the tools (except for Bounding Box tool), the script temporarily activates 3ds Max snapping for you to accurately pick specific points or places. You can choose which of the 3 snapping options to use at that time (vertex / edge / face), but the vertex snapping alone is ideal for most cases.
All measurements are placed in real 3D space, respecting your current view (Perspective or Orthographic).
Tape / Distance Tool
Click two points to measure the distance between them.
Drag to define the text projection plane.
The resulting spline represents a straight segment with its length displayed above it.
This tool has 2 modes. You can choose it from the dropdown list below the main toolbar:
– Dimension (world-aligned measurement / orthogonal)
– Distance (point-to-point measurement / either orthogonal or diagonal)
Angle Tool
Click three points: the first and third define the legs of the angle, and the second defines the vertex.
Drag to control where the arc and the value label appear.
The plugin automatically draws a visible arc showing the measured angle in degrees.
Radius Tool
Click 3 points on a circular edge or curve
Drag outward to define the radius projection.
A line and label appear showing the radius value.
Diameter Tool
Click 3 points on a circular edge or curve.
Drag to define the spline/text projection.
A straight line and label appear showing the diameter value.
Bounding Box Tool
Click on any object in your scene.
The plugin generates a rectangular or box-shaped measurement showing the object’s overall size along X, Y, and Z axes.
In Perspective view, the measurement appears as two adjacent box faces (the farthest from the camera); in Orthographic views, it appears as a clean rectangular outline.
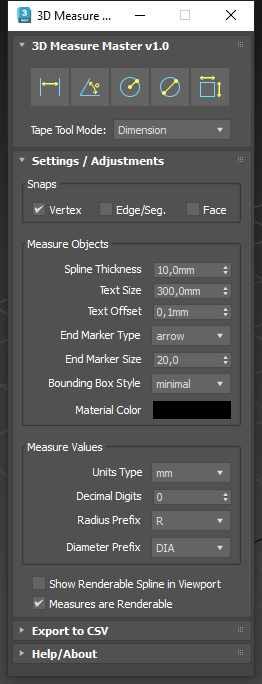
4. Settings / Global Adjustments
The Settings panel lets you define all global parameters that affect the appearance and behavior of every measurement object.
You can adjust:
-
Spline thickness – controls line width for all measurements.
-
Text size – overall size of the TextPlus value labels.
-
Text offset – distance between text and the measurement spline.
-
End marker type – choose between Arrow, Sphere, Cube, or None.
-
End marker size – adjust the 3D size of the markers.
-
Bounding box style – defines the visual style of bounding box measurements.
-
Measures material color – sets the color used by all measurement objects.
-
Units type – switch between meters, centimeters, millimeters, or feet.
-
Decimal digits – define the precision of numeric values.
-
Radius prefix – choose how the “radius” value is displayed (R, r., rad).
-
Diameter prefix – choose how the “diameter” value is displayed (DIA, d., diam.).
-
Show renderable splines in viewport – toggle spline rendering visibility.
-
Renderable measures toggle – enable or disable rendering for all measurement objects globally.
All global adjustments instantly affect both existing and new measurements in the scene.
5. Per-Measure Parameters
Each individual measurement can have its own set of parameters.
Select a measurement from the list to edit its attributes independently from the global settings.
Available parameters:
-
Spline projection distance – defines how far the spline is projected from the reference plane.
-
Spline thickness – line width for that specific measure.
-
Text size – font scale of the value label.
-
Text kerning – spacing between characters.
-
Text leading – spacing between lines in multiline text.
-
Text offset from spline – distance between the label and the nearest spline segment.
-
Custom text description – you can write additional comments or notes in the textbox, to be displayed below the measure value.
-
Lock/Unlock transform – prevents accidental movement or rotation of the measurement object.
-
Update measure value – recalculates and refreshes the numeric value after object or scene changes.
These per-measure controls let you customize key dimensions individually, without affecting the rest of the scene.
6. Other Considerations
Each 3D measure produced by this script is composed of a set of native 3ds Max objects (splines, TextPlus, helpers, meshes), which are gathered into a standard 3ds Max group and provided with dedicated custom attributes/parameters.
We strongly recommend not to modify or alter this groups in any way. That might cause undesired behaviours or break the script’s functionality.
6. Help / About section
This section includes help links and credits for this script.
7. Contact / Support
For customer support or making suggestions or business proposals, please don’t hesitate to contact us through this Contact Form.
You can also write us directly to contact@splinedynamics.com.
All feedback is greatly appreciated. We will try to answer all your inquiries as soon as possible.
Enjoy 3D Measure Master!
